Mapping Change in Cropland in Zimbabwe (Part 1)

I’m going to be working on a project that will ultimately require manually outlining tobacco fields in Zimbabwe. To help locate potential fields, it would be nice to have a model that can predict whether a giver area contains cropland. To train such a model required labeled fields – a chicken and egg scenario that should have me resigned to hours of manual work. But I much prefer not to do things if I can possibly get a computer to do it, and this post (along with one or more sequels) will document the ways I’ve made my life easier, and the lessons learnt in the process.

Trick #1: Standing on shoulders

I recently encountered a project that already did a lot of the hard work tagging fields all over Africa. Their results (featured in today’s Data Glimpse post) look great, but the training data used isn’t published. Now, I could just use their published map, but I’m also interested in change over time, while their map is based solely on 2015 data. What if we train a new model on the output of their model? This isn’t generally a great idea (since you’re compounding errors) but it might be good enough for our purposes.

Satellite image (left) and my predicted cropland (right, in red)

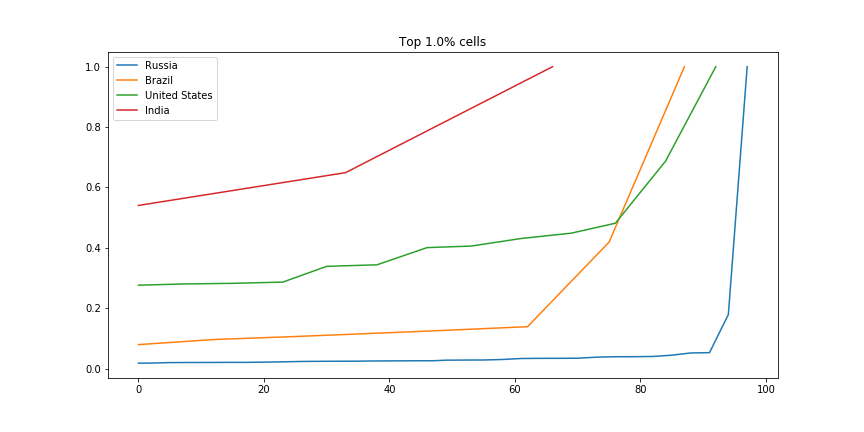
In Google Earth Engine (script available here), I created a composite image from Landsat 8 images taken in 2015, including NDVI, band values from a greenest-pixel composite and band values from late in the year (planting season for most crops). This is to be the input to out model. I then sampled 2500 points, recording the inputs (the bands of the composite image) and the desired output (the cropland probability made available by the qed.ai team). This data was used to train a random forest model (framing the task as a classification problem) and the predictions compared to the predictions from the QED data. The result: 99% accuracy.

Confusion matrix and accuracy

What does this accuracy figure mean? How is it so high? It’s less astonishing when we look more deeply. This is a model, the same type as that used by the QED team, with roughly the same inputs. It isn’t surprising that it can quickly replicate the decision function so accurately. It’s highly unlikely that it’s this accurate when compared to the ground truth. But we can say the following: we now have a model that is very similar to that used by the QED team to predict cropland probability for the year 2015.

Now what? Looking at change over time

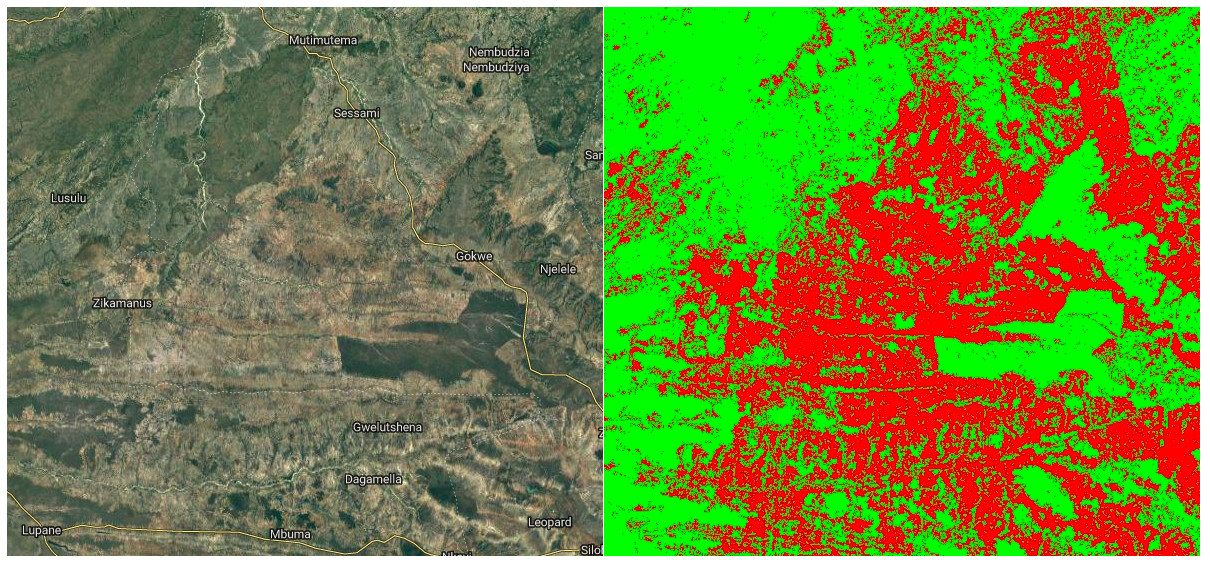
The model takes landsat 8 image data as it’s inputs. It was trained on 2015 data, but there is no reason why we can’t make predictions based on other years, and see where these predictions differ from the 2015 ones. Subtracting two years’ predictions gives a difference image, shown below for 2015 – 2018. Red indicated areas where cropland is predicted in 2018 and not 2015 (new cropland). Black and green are areas where the model predicts no change or less cropland in 2018.

Difference Image (2018). Potential new cropland shown in red.

I don’t want to trust this model too much, but if nothing else this shows some areas where there might be fields that have appeared in the last few years. I now have a much better idea where to look, and where to dig deeper with manual inspection of images from different years.

Conclusions and next steps

This sets the scene for my next steps: manually outlining fields, differentiating between different crop types, training an improved model, adding more inputs… Stay tuned for part 2.

Data Glimpse: Cropland and Settlement maps from QED.AI

The point of this Data Glimpse post is to feature a wonderful yet badly publicized data source: https://maps.qed.ai/. Using crowd-sourced data, they built really accurate maps of fields and settlements for the whole of Africa. They also make related spatial layers available (Enhanced Vegetation Index for different years, soil metrics etc). Their focus is “data systems and AI for health and agriculture”. The soil maps draw heavily on the AfSIS project, which makes the data from thousands of soil samples available (https://www.isric.org/projects/africa-soil-information-service-afsis).

The maps.qed.ai interface showing cropland probability

The QED maps interface makes it really easy to download all the available maps at 1km resolution. I’m not going to do any further analysis in this post – these maps are useful without modification, and it was really interesting for me to see the distribution of agriculture in Africa. The cropland probability map will be making an appearance in the next post.

Data Glimpse: Nighttime Lights

This ‘Data Glimpse’ post will look at the Global Radiance-Calibrated Nighttime Lights dataset [1], available through Google Earth Engine. However, the method shown here can be used with any Raster data source. To avoid repetition, I’ll refer back to this post any time I aggregate raster data over a shapefile.

The Data

The dataset is a collection of images from different years showing nighttime lights all over the globe. This information can be used to see where people are [2] and estimate measures such as economic activity in an area [3]. They have been used in some great research estimating the Global Human Footprint and highlighting the last wild places on earth [4].

Nighttime lights displayed in GEE

Each image contains two bands: ‘avg_vis’, which is the measure of illumination, and ‘cf_cvg’ describing cloud cover (used as a data quality metric).

Aggregating the Data by Region

Instead of a large raster image, we might want to aggregate the data by region. For example, we might want to look at how the amount of light visible at night in National Parks has changed over time. To get the data in the form that we want, we first need to define the regions that we’re interested in. This script that I made to illustrate the idea uses a landuse map of Zimbabwe as an example, but one could just as easily use Country outlines or draw a region with the ‘Draw a shape’ tool in GEE.

With the input region(s) defined, the key step is to use the reduceRegions function to add properties to each feature (area) that summarize the underlying raster. For example, with an image of nighttime illumination in the year 2000 called ‘lights_2000’ and the landuses map, we can add the mean illumination in each area with var landuse_with_lights = lights_2000.reduceRegions(landuses, ee.Reducer.mean());. The result can be exported as a shapefile or CSV file (see the script for details) and displayed or analyses in whatever software you like.

Average nighttime illumination over Zimbabwe

Change over Time

One of the nice things about this dataset is that it contains values for several different years. I took a look at the data from 2000 and 2010, with the goal of seeing if protected areas (forest lands, national parks etc) had seen an increase in nighttime lights (an indicator that people are moving into these areas). Most protected areas in Zimbabwe had almost no nighttime lights recorded, and those that did show (on average) a drop in the amount of nighttime lights (2010 values are ~20% lower than those for 2000). In the few places where lights had increased, the increase seems to be due to safari camps rather than encroachment from neighboring districts. The data can’t tell the whole story, and poor coverage plus the relative dimness of firelight might mean that some encroachment is missed, but it was encouraging to see that the wilderness areas are still largely dark and empty – just the way they should be.

References

[1] – https://developers.google.com/earth-engine/datasets/catalog/NOAA_DMSP-OLS_CALIBRATED_LIGHTS_V4
[2] – Elvidge, C.D., Imhoff, M.L., Baugh, K.E., Hobson, V.R., Nelson, I., Safran, J., Dietz, J.B. and Tuttle, B.T., 2001. Night-time lights of the world: 1994–1995. ISPRS Journal of Photogrammetry and Remote Sensing, 56(2), pp.81-99.
[3] – Wu, J., Wang, Z., Li, W. and Peng, J., 2013. Exploring factors affecting the relationship between light consumption and GDP based on DMSP/OLS nighttime satellite imagery. Remote Sensing of Environment, 134, pp.111-119.
[4] – Sanderson, E.W., Jaiteh, M., Levy, M.A., Redford, K.H., Wannebo, A.V. and Woolmer, G., 2002. The human footprint and the last of the wild: the human footprint is a global map of human influence on the land surface, which suggests that human beings are stewards of nature, whether we like it or not. BioScience, 52(10), pp.891-904.

Data Glimpse: South Africa’s Hydrological Data

South Africa’s Department of Water Affairs (DWA) makes all kinds of data publicly available through their data portal: http://www.dwa.gov.za/hydrology/. The download interface is a little clunky, but simple once you get the hang of it. This short post will take a look at some typical data, and list some of the ways this could be used in the future.

The DWA website, after selecting ‘Verified data’.

Most of the data comes from monitoring stations, each of which is assigned a unique ID. The easiest way to find stations in your area of interest is via the ‘Station Catalogue’ link visible in the above screenshot. Stations are typically a depth measure in a dam or river.

With a station chosen, the next step is to specify the date range and type of data you’d like to download. The available dates and information are listed in the Station Catalog. I picked a station in the Pongola river system, and saved the data file generated by the website as ‘daily_flows.txt’. This is a text file with variables separated by whitespace, and can be loaded into a pandas dataframe for analysis as follows:

Loading the data.

With the data thus loaded, it’s fairly easy to pot the flow over a given year, or calculate monthly averages. Here’s a plot showing the daily flow rate out of Jozini dam in 2018. Note that the graph has many flat areas – this is because this is a managed flow, with the amount of water released from the dam regulated by local authorities (somewhat badly, in this case [2]).

A plot of the daily flow rate.

A notebook showing more plots and an example of re-sampling for yearly averages is available here.

So what can you do with this data? Here are some ideas (let me know if you’d like to see any as future posts):
– Get dam level data for dams all over South Africa and and animate the levels over time, to illustrate the recent drought and the (alarming) longer trend.
– Use the data to learn hydrodynamic modelling (see [1])
– Combine with rain data to see how watershed capture has changed with agriculture and land use change
– Look for the change in river flows after new projects (dams, diversions and so on)

I hope you’ve enjoyed this brief glimpse at some fun data. Please let me know if you do something with this, or if you have some data that you’d like featured.

References:
[1] – Birkhead, A.L., Brown, C.A., Joubert, A.R., Singh, A. and Tlou, T., 2018. The Pongola Floodplain, South Africa–Part 1: Two-dimensional hydrodynamic modelling in support of an environmental flows assessment. Water SA, 44(4), pp.731-745.

[2] – Lanyi, Shira. 2018. “Paradise Lost: The Struggle to Preserve the Pongola River and its Inhabitants.” Open Rivers: Rethinking Water, Place & Community, no. 11. http://editions.lib.umn.edu/openrivers/article/paradise-lost/.

Data Glimpse: Visualizing Economic Activity with the G-Econ Project data

This is the first ‘data glimpse’ – a short exploration of an existing dataset, with code and examples showing some of the ways the data can be used. For today’s glimpse, I’ll be playing with the ‘G-Econ’ dataset [1], as recommended by <jonasmendes> on Pioneer. This dataset looks at economic activity for different locations, as opposed to breaking it down by country. There is data available from 1990, 2000 and 2005, broken down by ‘grid cell’ (a square one degree wide and one degree high).

Economic Activity by Grid Cell – G-Econ data for 1990

Loading the data

The data is shared as a Microsoft Excel worksheet [2]. There are 27,446 rows, and it’s a little overwhelming visually. Spreadsheets aren’t my forte, so my first step was to load the data into a Pandas DataFrame in a Jupyter notebook (available here for anyone who wants to follow along). With the data ready, I set out on the most obvious task: showing the data as a map. A few minutes of StackOverflow later, we have a visual and a GeoTiff file that can be opened in mapping software such as QGIS:

Asking questions

Because the data is aggregated by location (as opposed to population), it can answer some interesting questions. How does economic output vary with temperature or rainfall? How ‘centralized’ is industry in different regions? What’s the deal with all that $$$ hugging the coastlines? Let’s dig in.

Environmental Factors

First up, the effect of temperature:

Not much gets done where it’s cold, it seems

What about rainfall?

Economic Activity (2000) vs max precipitation (mm rainfall)

And finally, distance to the ocean:

Coasts are the place to be?

It appears that the most productive places are those where people like to be: accessible, not too hot, not too dry but not constantly drenched… A Goldilocks zone for human activity. The data already contains these environmental variables – I highly encourage you to try your own plots, or to read up the more thorough analyses in [1].

Comparing Countries

There are many ways we could compare countries. A bar plot of average economic activity per grid cell, perhaps, or comparison between the most productive single grid cell in each country. I was interested to see which countries had the most spread. The GIF below shows this dramatically: the top few cells in Russia are responsible for a huge chunk of the economic activity, while India has much more of a spread:

Scaled fraction of the total economic activity in four countries.

For the code, see the GitHub repository associated with this post.

Conclusions

I hope you’ve enjoyed this quick, informal look at a fun dataset. I’m planning on doing more of these ‘Data Glimpse’ posts, since they take less time than a full write-up. The trade-off is that quality is lower, since I’m not going to invest time into perfectly labelled axes, long explanations or extra figures. Let me know what you think about this plan!

References:
[1] – Nordhaus, W., Azam, Q., Corderi, D., Hood, K., Victor, N.M., Mohammed, M., Miltner, A. and Weiss, J., 2006. The G-Econ database on gridded output: Methods and data. Yale University, New Haven6.References:
[2] – https://gecon.yale.edu/data-and-documentation-g-econ-project (accessed June 2019)

New Database: Forest Change in Different Regions

Forest loss is a major problem facing many parts of the world right now. Trees are being cleared to make way for agriculture, or simply cut down for fuel and timber. Tracking this loss is an important goal, and much work has been done in this area.

One of the best datasets on the topic is the Hansen Global Forest Change [1] dataset, available for free on the Google Earth Engine platform. This dataset tracks forest loss since the year 2000, and has become a key tool in fighting deforestation.

Forest cover (green), loss (red) and gain(blue) – from the Hansen dataset[1]

There is only one issue that I have with this data: it is HUGE! Approximately 1.22 TB. For anyone unable to write the code needed to analyse the data in GEE, this size means that downloading the data or importing it into traditional mapping applications is not feasible. And often we don’t need all of this data, instead simply requiring a few key stats on an area of interest. Consider wanting a graph of forest loss in your country over the last 20 years: it’s a nice visual to help you make a point, but it’s not worth learning to code or downloading >1TB of data for.

This leads to today’s project. I wrote some code that takes in a file specifying the boundaries of different regions. It then aggregates the data from the Hansen dataset over each of the specified regions. For example, I used the Large Scale International Boundary Polygons (LSIB) [2] map of the world’s countries as an input, ending up with total forest loss, loss per year and forest cover for every country in a convenient 98 KB csv file. It also outputs a version of the input file as a shapefile, with added attributes containing the summarized forest change data. The former is all you need to plot change over time, see which regions have experienced the most loss or identify which country has lost the most forest in the last ten years. The latter is nice for creating colorful maps displaying this information – it’s only ~60MB, and loads quickly into the mapping software on my laptop.

Forest loss in different regions

The Earth Engine code is available here.The rest of this post will explain how to use the generated datasets (available here) for simple analyses.

Viewing the shapefile in QGIS

QGIS [3] is an open source GIS application. The vector file (available here) can be opened in QGIS with ‘Open Data Source Manager’ -> ‘Vector Layer’ -> browse to the .shp file and click ‘Add’. By default, it looks uniform. To see the information better, right click on the layer, open properties and change the style from ‘single symbol’ to ‘graduated’:

Setting the style of the vector layer in QGIS

With these settings applied, the differences between countries become apparent. Play with the colours and classes until it looks good. To query the exact value of the loss in a given country, use the ‘Identify Features’ tool (Ctrl-Shift-I) and click to see all the attributes. To create a beautiful PDF map, consult a tutorial such as this one for all the fancy output options.

Forest loss displayed in QGIS

Analyzing the data with Python + Pandas

The smaller csv file (available here) is good for cases where the country outlines are not required. It is possible to open the file in Excel or Google Sheets, but let’s stretch our Python muscles and make some simple plots. A notebook with the full code for this example is available in the GitHub repository.

The first step is loading the data: we import the necessary libraries then load the data into a pandas DataFrame with “df = pd.read_csv(‘countries_w_hansen.csv’)”. For our first plot, let’s look at the total loss (from the ‘loss’ column) for different world regions:

Plotting forest loss for different regions

The Hansen data encodes the years different areas experienced loss events. This data is captured in the ‘Group X’ columns. We can sum these columns to see the total loss each year, and note the worrying trend:

Forest loss per year

Of course, we have the country data, and can focus on a single country or region using df.loc:

Forest loss over time in Africa. The drop looks encouraging… until you consider the latest date this data was updated (2018 was still ongoing)

Where next?

This data is fairly depressing, but my hope is that an exploration of it doesn’t end with resignation. There are things we can do, ways we can help reduce this loss. Take a look at the data. Share the stats on your country, and push for change. Post those graphs on Facebook, call your representatives and demand action, find an organization working to fight this… If we’re serious about saving our planet, we’re all going to have to be involved.

References

[1] – Hansen, M. C., P. V. Potapov, R. Moore, M. Hancher, S. A. Turubanova, A. Tyukavina, D. Thau, S. V. Stehman, S. J. Goetz, T. R. Loveland, A. Kommareddy, A. Egorov, L. Chini, C. O. Justice, and J. R. G. Townshend. 2013. “High-Resolution Global Maps of 21st-Century Forest Cover Change.” Science 342 (15 November): 850–53. Data available on-line at: http://earthenginepartners.appspot.com/science-2013-global-forest.

[2] – LSIB: Large Scale International Boundary Polygons, Simplified
The United States Office of the Geographer provides
the Large Scale International Boundary (LSIB) dataset. The detailed
version (2013) is derived from two other datasets: a LSIB line
vector file and the World Vector Shorelines (WVS) from the National
Geospatial-Intelligence Agency (NGA).

[3] – QGIS. A Free and Open Source Geographic Information System. qgis.org

[4] – GitHub repository containing data and code: https://github.com/johnowhitaker/hansen_data_countries

Pioneer Tournament has Begun!

I have some more posts in the pipeline, including some more Zindi fun. BUT, that will all have to wait. The next round of the Pioneer Tournament (pioneer.app) has begun, and I’ll be entering and using this blog to share progress towards my goal: Creating rich new datasets (along with educational material on how to use them) for ‘data-poor’ regions using satellite imagery and other public data sources. Stay tuned for the first output, and enjoy this AI-generated music while you wait:

Zindi Competition 2 – Trying CatBoost on the Traffic Jam Challenge

Zindi ran a challenge predicting bus ticket sales into Nairobi. It is now closed, but we can still make predictions and see how they would have done. This was a very quick attempt, but I wanted to try out CatBoost, a magical new algorithm that’s gaining popularity at the moment.

With a little massaging, the data looks like this:

The ‘travel_time’ (in minutes) and ‘day’ columns were derived from the initial datetime data. I’ll spare you the code (it’s available in this GitHub repo) but I pulled in travel times from Uber Movement, and added them as an extra column. The test data looks the same, but lacks the ‘Count’ column – the thing we’re trying to predict. Normally you’d have to do extra processing: encoding the categorical columns, scaling the numerical features… luckily, catboost makes it very easy:

Training the model

This is convenient, and that would be enough reason to try this model first. As a bonus, they’ve implemented all sorts of goodness under the hood to do with categorical variable encoding, performance improvements etc. My submission (which took half an hour to implement) achieved a score of 4.21 on the test data, which beats about 75% of the leaderboard. And this is with almost no tweaking! If I spent ages adding features, playing with model parameters etc, I have no doubt this could come close to the winning submissions.

In conclusion, I think this is definitely a tool worth adding to my arsenal. It isn’t magic, but for quick solutions it seems to give good performance out-of-the-box and simplifies data prep – a win for me.

This was a short post since I’m hoping to carry on working on the AI Art contest – expect more from that tomorrow!

Zindi Competition 1 – Making Art!

I’m going to try entering some Zindi competitions this week. First up is the ‘AI Art’ contest. I have many crazy plans, but my nascent tensorflow skills mean everything takes time. For now, let me present my first attempt:

‘Bridge over Rainbow Water’ – J Whitaker, 2019

This is made with a technique called Style Transfer. For more information and an easy way to try it out yourself, see the example on Google Colab. The general idea is to use a neural network to generate images that are similar to a ‘content image’ but that have the style of a separate ‘style image’. The way the style difference is quantified is by using a network trained for image recognition – the early layers in these networks tend to measure style attributes.

Now for the specifics of this piece:
– The general practice is to start from the content image, and slowly morph to an image that stylistically matches the style image. I turned this around, beginning with the style image and watching the structure slowly emerge.
– I tweaked the learning rate and other parameters, trying to maintain the curving, flowing nature of the style image even as the straight lines of the bridge come forward.
– Most styles are picked from famous artists. Since this is a co-creation with my laptop, the style image is a microscope image of my screen, which was itself displaying the microscope feed. The screen’s sub-pixels are the source of the rainbow colours.

Some attempts that didn’t make the cut:

As you might suspect, I’ve been playing with introducing distortion into the process. Just as we perceive a work in progress through the lens of our eyes (from different angles, with non-uniform lighting), I’d like the algorithm to only see a distorted view of it’s output. This could be a blur or transform, but ultimately I’d like to try using a webcam and some wavy glass to create a means of perception for my co-artist.

Stay tuned for more attempts at music and art!

Looking at traffic/congestion vs air quality AKA a quest for data

I’m currently on a mission to explore the different datasets available publicly, and hopefully to add to that list. One key reason I’m passionate about this is that data often generates good questions. This post documents an example of this. Soon after seeing the air quality databases available on BigQuery, I started to think about if/how this relates to traffic. I had Uber movement in mind, but I was also curious what other traffic data is available. Once that initial question lodges in the mind, a journey begins.

First try: Uber movement travel times as a proxy for traffic levels

Uber movement makes various data from millions of Uber rides available to the public. However, it isn’t particularly easy to estimate traffic from the available data. Daily average travel times are only available for a single, selected route at a time, and for a maximum of three months per download. The restrictions make sense, but are a little inconvenient. To get around this, I chose one route through the centre of my city of interest and decided to use this as a rough measure – longer travel times would hopefully translate to days with heavier traffic. To get better estimates, one could repeat this for many different routes to improve the metric.

Average uber ride travel times – a rough proxy for traffic conditions?

I initially selected Nairobi for my investigation, since Uber data is available there and it seemed like air quality data was available as well. However, looking more closely at the air quality data revealed that it is sparse and there was almost none available for the dates that uber movement data had been gathered. So, with regret, I moved my initial exploration to the States, where air quality data has been gathered in many locations for decades – just one more way in which Africa lags behind in terms of data availability.

I chose Pittsburgh, since it seemed as good a place as any when I looked at the list of cities with Uber Movement data. As before, I picked a route through town and downloaded the average daily travel times from movement.uber.com. To get the air quality data, I turned to Google Bigquery. The following code pulls the relevant data from the giant (>1GB) dataset:

Querying the epa historical air quality dataset

The resultant 1MB csv can be downloaded and loaded into a pandas dataframe for analysis. Combining it with the uber data meant it was time for the moment of truth: is there a correlation between travel times (as a measure of traffic intensity) and air quality? Let’s plot the two:

Air quality (X axis) vs mean travel times (y axis)

If anything, there was a tiny negative correlation. But the main issue is the quality of the data. A single route is probably not a good metric for traffic as a whole. Less than a year’s worth of data is not great. This ignores co-factors such as weather. Etc, etc. Can we do better?

Take Two: Better traffic data

I plan on looking deeper into Uber Movement data in the future, but for this quick project I wanted a better source of traffic data to answer my initial question. Fortunately, the wonderful City of Chicago has a treasure-trove of data available: https://data.cityofchicago.org/. Their historical traffic data comes from sensor-laden busses tracking traffic speed. The dataset is fairly large, so to avoid taxing my Zimbabwean internet connection I used Google Colab to download the data and upload it to BigQuery for later. I could also start playing with the data in Colab’s notebook interface:

Loading the data into pandas with Google Colab

A description of the dataset from the data portal:

I processed the data to get an average speed over all regions for each day. This, combined with the historical air quality measurements from the EPA database, gave me the data I desired:

Analysing the data

No obvious trend (correlation coefficient of -0.008). Honestly, not quite what I was expecting!

So what does this mean?

I haven’t done any proper analysis yet (scatter plots don’t really count), but that wasn’t the point. I saw some data, I had a question in mind, I found the data I needed to start answering it and I got some quick results. Tools like Google BigQuery and Colaboatory let anyone access and manipulate large datasets, and the availability of data means that you don’t have to belong to a company or research organisation to do serious research.

I have 8 minutes left before I need to get back to work, so this is where I’ll end this post. I hope you’ve enjoyed this small demo of what is possible when curiosity meets open data. If you’d like to try this yourself, contact me for code if I haven’t yet uploaded the notebooks and data used here to GitHub. Share any other questions you’d like me to look into, and please send me any interesting datasets you come across. Farewell until next time.